Showing posts with label Cement. Show all posts

Compressive Strength Test of Cement

The compressive strength of hardened cement is the most important of all properties. Therefore, cement is always tested for its strength at the laboratory before the cement is used in important works. Strength tests are not made on neat cement paste because of difficulties of excessive shrinkage and subsequent cracking of neat cement. The strength of cement is indirectly found on cement sand mortar i specific proportions.
The compressive strength test on hydraulic cement other than masonry cement is performed as per IS 4031 Part-6.
The standard sand to be used shall conform to IS 650

Apparatus
  1. Vibration machine: Vibration machine shall conform to IS 10080

  2. Poking Rod: Poking rod shall conform to IS 10080

  3. Cube Mould: The mould shall be of 70.6 mm size conforming to IS 10080

  4. Gauging Trowel: The gauging trowel shall have a steel blade 100 to 150 mm in length with straight edges weighing $210 \pm 10 g$

  5. Balance: The permissible variation at a load of 1000 g shall not be more than $\pm 1 g$ for a new balance and $\pm 0.5 g$ for old balance

Preparation of Test Specimens
  1. The quantity of cement, standard sand and water to fill a cube is
    Cement: 200 g
    Standard sand: 600 g
    Water: $(\frac{P}{4}+3.0)$ per cent of the combined mass of cement and standard sand. Where $P$ is the water required to produce a paste of standard consistency.
    Note: The material for each cube should be mixed separately.

  2. Mix the sand and cement on a non-porous base for a minute and then add water. Mixed it until a uniform colour is obtained. The time of mixing should not be less than 3 minutes nor greater than 4 minutes.

Moulding Specimens
  1. Cover the joints between the halves of the mould with a thin film of petroleum jelly and apply a similar coating of petroleum jelly between the contact surfaces of the bottom of the mould and its base plate in order to ensure that no water escapes during vibration. Treat the interior faces of the mould with a thin coating of mould oil.

  2. Place the assembled mould on the table of the vibration machine and hold it firmly in position by means of a suitable clamp. Attach a hopper of suitable size and shape securely at the top of the mould to facilitate filling and this hopper shall not be removed until the completion of the vibration period.

  3. Immediately after mixing the mortar, place it in the cube mould and prod with the poking rod 20 times in 8 seconds. Place the remaining portion of mortar in the hopper and prod again and then compact the mortar by vibration.
    The period of vibration shall be 2 minutes at a specified speed of $12000 \pm 400$ vibrations per minute.

  4. At the end of vibration, remove the mould together with the base plate from the machine and finish the top surface of the cube in the mould by smoothing the surface with the blade of a trowel.

  5. Curing Specimen: Keep the compacted cubes i the mould at a temperature of $27 \pm 2^\circ C$ and at least 90% relative humidity for 24 hours. After 24 hours the cubes are removed from the mould and immersed in clean fresh water until taken out for testing.
Testing of Cubes

Test three cubes for compressive strength for each period of curing mentioned under the relevant specifications for different hydraulic cement, the periods being reckoned from the completion of vibration.

The cubes shall be tested on their sides without any packing between the cube and the steel plattens of the testing machine. One of the plattens shall be carried on a base and shall be self-adjusting, and the load shall be steadily and uniformly applied, starting from zero at a rate of $35 N/mm^2/min$.


Compressive Strength of different types of cement
Type of Cement Compressive Strength

1 Day
min. MPa

3 Days
min. MPa

7 Days
min. MPa

28 Days
min. MPa
OPC 33 NS 16 22 33
OPC 43 NS 23 33 43
OPC 53 NS 27 37 53
Rapid Hardening 16 27 NS NS
Low Heat Cement NS 10 16 35


Soundness Test of Cement (Autoclave Method)


The Le-Chatelier test detects unsoundness due to free Lime only. This method of testing does not indicate the presence and after effect of the excess of magnesia.

As per Indian Standard specification, if the content of magnesia is greater than 3% in cement then Autoclave Test is performed which is sensitive to both Lime and Magnesia.

The Autoclave test is performed as per IS: 4031 Part-3

Apparatus:
  1. Balance:
    The variation on balance in use shall be +/- 1.0 gram per 1000 gram. The permissible value of a new balance shall be half of this value.

  2. Weights:
    Same as in Le-Chatelier Method

  3. Graduated Glass:
    Graduated glass cylinders of 150 ml capacity shall be used. The permissible variation on these cylinders shall be plus or minus one millilitre. The main graduation lines of the cylinders shall be in circles and shall be numbered. The least graduations shall extend at least one-seventh of the way around, and intermediate graduations shall extend at least one-fifth of the way around the cylinder. The graduation lines may be omitted for the lowest 5 ml.

  4. Moulds:
    Moulds of 25 X 25 mm size and 282 mm internal length and other accessories shall conform to IS 10086-1982.

  5. Autoclave:
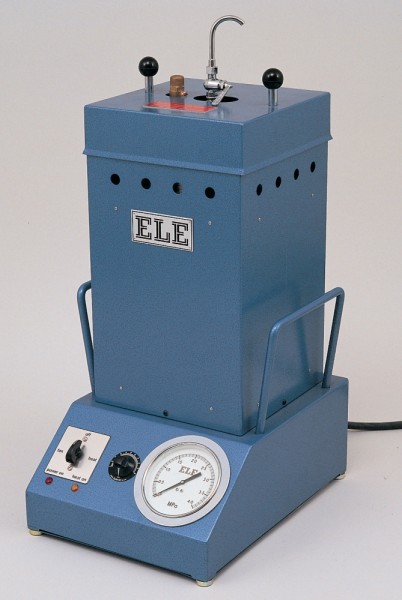
    The autoclave shall consist of a high-pressure steam boiler equipped with a suitable safety device. The capacity of the heating unit shall be such that with maximum load ( water plus specimens ) the pressure of the saturated steam in the autoclave may be raised to a gauge pressure of 2.1 MPa or to an absolute pressure of about 2.2 MPa, in 1 to 11 hour from the time the heat is turned on. The automatic pressure control shall be capable of maintaining the pressure at 21 ± 01 MPa corresponding to a temperature of 215.7 ± 1.7°C. The autoclave shall be designed to permit the pressure to drop from 21 MPa to less than 0.07 MPa in one hour after the heat supply has been shut off. It shall be equipped with a vent valve for allowing the escape of air during the early part of the heating period and for releasing any steam pressure remaining at the end of the one-hour cooling period. The pressure gauge shall have a nominal dial diameter of 115 mm and shall be graduated from 0 to 4.1 MPa with the scale division of not more than 0.04 MPa. The error in the gauge shall not exceed plus or minus 0.02 MPa at the operating pressure of 2.1 MPa.

    Source: ELE International

  6. Length Comparator:
    Changes in the length of the test specimen shall be measured by an apparatus conforming to
    IS 9459-1980
.
Preparation of Test Specimens
  1. Preparation of Mould:
    The mould shall be covered with some mineral oil. After the application of oil, the stainless steel or non-corroding metal reference inserts with knurl heads shall be set to obtain an effective length of 250 mm.

  2. Mixing Cement Paste:
    The standard batch of cement paste shall consist of 500 g of cement, mixed with sufficient water to give a paste of standard consistency.

  3. Moulding Specimens
    Immediately following the completion of mixing, the test specimens shall be moulded in one or two layers, each layer being compacted with the thumb or forefinger by pressing the paste into the corners, around the reference inserts, and along the surfaces of the moulds until a homogeneous specimen is obtained. After the top layer has been compacted, the paste shall be cut off flush with the top of the mould and the surface smoothed with a few strokes of the trowel. During the operations of mixing and moulding, the hand shall be protected by rubber gloves.

  4. Storage of Test Specimen
    After the mould has been filled, it shall be immediately placed in a moist closet or a moist room. Specimens shall remain in the moulds in the moist room for at least 24 h. If removed from the moulds before 24 h, they shall be kept in the moist closet or moist room until tested.


Procedure:
  1. Remove the specimen from the moist atmosphere after $24 \pm 1/2 h$ and measure its length and place it in Autoclave at room temperature in a rack in such a way so that all the four sides are exposed to saturation steam.

  2. There should be enough water in Autoclave to maintain an atmosphere of saturated steam vapour during the entire period of the test. Normally 7 to 10 % of the volume of the autoclave is occupied by water.

  3. In the starting phase of heating, let the air to escape by opening the vent valve until stream begins to escape.

  4. After that, the vent valve is closed and the temperature in the autoclave is raised in such a way that gauge pressure of the steam is increased to 2.1 MPa in 1 to 1.25 Hours from the time heat is turned on.

  5. Maintain this pressure for 3 hours and after this period shut off the heat supply and allow autoclave to cool down at a rate such that the pressure is less than 0.1 MPa after an hour. Dissipate the remaining pressure by partially opened vent valve.

  6. Open the autoclave and immediately place the specimen in water of temperature more than $90^\circ C$

  7. Cool the water surrounding the bar by adding cold water so that the temperature of the water lowers to $27 \pm 2^\circ C$ in 15 minutes

  8. Measure the length of the specimen when it is surface dry.

Calculation

The difference between the lengths measured before and after the autoclaving shall be calculated nearest to 0.01 per cent of the effective gauge length which is the length between the innermost points of the metal insert used as reference points and shall be reported as autoclave expansion of cement.

Autoclave soundness limits for different cements


Cement Soundness (%) Max Cement Soundness (%) Max
33 Grade OPC 0.8 Slag Cement 0.8
43 Grade OPC 0.8 Low Heat Cement 0.8
53 Grade OPC 0.8 Masonry Cement 1
Sulphate Resisting Cement 0.8 OPC Grade 53 S [IRS-T-40] 0.8
Portland Pozzolana Cement 0.8
Rapid Hardening Cement 0.8


Soundness Test of Cement (Le-Chatelier Method)

It is very important that the cement shall not undergo any appreciable change of volume. The change in volume causes disruption of the set and hardened mass of concrete. This will seriously affect the durability of concrete. The soundness test of cement is done to ensure that the cement does not show any appreciable change in volume.

The unsoundness in cement is due to the presence of the excess of Lime than that could be combined with acidic oxide at the kiln. It could also be due to the high proportion of magnesium or calcium sulphate.

Unsoundness in cement does not come to surface for a considerable period of time. Therefore, accelerated tests are required to detect it.

Le-Chatelier Method to detect unsoundness as per IS:4031-Part 3:


The Le-Chatelier test detects unsoundness due to the excess Lime ONLY.

The test apparatus shall conform to IS 5514:1996.


The variation on balance in use shall be +/- 1.0 gram per 1000 gram. The permissible value of a new balance shall be half of this value.

The permissible value on weight are given below:

Weight (g) Permissible variation on weight (g) Weight (g) Permissible variation on weight (g)
500 0.35 20 0.05
300 0.30 10 0.04
250 0.25 5 0.03
200 0.20 2 0.02
100 0.15 1 0.01
50 0.10


Water Bath capable of containing immersed Le-Chatelier moulds with specimens and of raising their temperature from $27\pm 2^\circ C$ to boiling in $27 \pm 3$ minutes.

Procedure:

  1. Prepare the cement paste by gauging cement with 0.78 the water required to give a paste of standard consistency.

  2. Place the lightly oiled mould on a lightly oiled glass sheet and fill it with cement paste.

  3. Cover the mould with another piece of a lightly oiled glass sheet and place a small weight on the covering glass sheet.

  4. Submerge the whole assembly in water at temperature $27 \pm 2^\circ C$ immediately and keep it there for 24 hours.

  5. Measure the distance separating the indicator points to the nearest of 0.5 mm.

  6. Submerge the assembly again at the temperature as specified above and bring the water to boiling, while the assembly is submerged, in 25 to 30 minutes and kept it boiling for 3 hours.

  7. Remove the assembly from the water and allow it to cool and measure the distance between the indicator points.

  8. The difference between the two reading indicates the expansion of the cement


Retest: If the cement fails to meet the test for soundness, a retest may be made after aeration. For this purpose, spread out the cement in a layer of 75 mm thickness and store it for 7 days in an atmosphere maintained at a temperature of $27 \pm 2^\circ C$ and relative humidity of 50 to 80 %.


Le-Chatelier soundness limits for different types of cement

Cement Soundness (mm) Max Cement Soundness (mm) Max
33 Grade OPC 10 Slag Cement 10
43 Grade OPC 10 High Alumina Cement 5
53 Grade OPC 10 Super Sulphated Cement 5
Sulphate Resisting Cement 10 Low Heat Cement 10
Portland Pozzolana Cement 10 Masonry Cement 10
Rapid Hardening Cement 10 OPC Grade 53 S [IRS-T-40] 5


Initial and Final Setting time test for Cement

This test is perform to check the initial and final setting time of cement. The initial setting time is determined so as to give sufficient time for various operations like mixing, transportation, placing and compaction of cement mortar or concrete.
The final setting time is determined to find that after laying the mortar or concrete, the hardening should be rapid so  that the structure may be made in use as early as possible.

This test is performed as per IS 4031 Part 5 using Vicat appratus conforming to IS 5513.


Initial Setting Time:
  1. Take clean cement of about 400 g in weight sieved through IS sieve no 9.

  2. Add water at a rate of 0.85 P byweight of cement.
    P = Percentage of water required for normal consistency.

  3. Start the stop clock as soon as the water is added to the cement.

  4. Filled the vicat mould in the same way as done while performing consistency test.

  5. Place the mould on the base plate of the apparatus centrally below the movable rod to which neddle is attached and brought in contact with the surface of the cement paste.

  6. Note the initial reading and release the rod quickly without any jerk and note the penetration.
    In the begining, the needle will completely penetrate the cement paste.

  7. The procedure is repeated until the needle fails to penetrate the block for about 5 mm, measured from the bottom of the mould.

  8. Note: While repeating the penetration process, the needle should be cleaned and released at a new place on the top of the surface.


Final Setting time:
  1. Replace the neddle of the vicat apparatus with annular attachment(Neddle F).

  2. Release it on the top surface of the mould at regular intervals and record the time.
    In the begining, the needle and the collar will make impressions on the top of the paste.

  3. Note the time at which only needle leaves the impression and collar fails to do so.

  4. Note: Clean the needle each time and the needle should be released at a new place in each trial.


Setting time of Different Cements in minutes
Ordinary Portland Cement Rapid Hardening Cement Low Heat Cement
Initial Setting Time  30  30  60
 Final Setting Time  600  600  600


Consistency Test of Cement

Consistency test is performed to determine the quantity of water required to produce a cement paste of standard consistency. It is essential to fix the quantity of water to be mixed with cement to perform test such as Initial and Final setting time of cement, soundness test, compressive strength test of cement etc. Therefore, one has to perform this test before one can perform other tests on cement.

This test is performed as per IS 4031 Part 4.


Standard or normal consistency of a cement paste is that consistency which will permit the Vicat Plunger, 10 mm in diameter and 40 to 50 mm in length to penetrate to a point 5 to 7 mm from the bottom or 33 to 35 mm from the top of the Vicat mould when the paste is tested within 3 to 5 minutes after it is thoroughly mixed with water.

Vicat Apparatus to be used in test shall conform to IS 5513

Procedure:
  1. Take about 400 g of sieved cement through IS sieve no 9.

  2. Add 100 g of water to cement in a non porous vessel and mixed thoroughly for about 3 minutes.

  3. Fill the Vicat mould (placed on a non porous plate) with the cement paste, make its top surface level and struck off the surplus paste by means of a trowel.

  4. Shake to mould filled with paste slightly to expel the air.

  5. Place the mould on the base plate of the apparatus centrally below the movable rod to which plunger is attached and brought in contact with the surface of the cement paste.

  6. Note the initial reading and release the rod quickly without any jerk and note the penetration.

  7. If the penetration is between 33 to 35 mm from top of the mould then the paste is said to be of normal consistency, other wise test should be repeated with different water quantity.

Note: The time of gauging shall note be less than 3 minutes nor more than 5 minutes.

Percentage of water for normal consistency,

                                   $P=\frac{\text{Weight of water for desired penetration}}{\text{Weight of cement taken}}\times 100$